Giới thiệu Virtual Host
Virtual Hosts được sử dụng để giúp cho một VPS có thể chạy được nhiều website khác nhau.
Các bước add thêm website trên VPS Apache chạy CentOS bằng Virtual Hosts như sau:
Chuẩn bị server
Đã cài đặt sẵn webserver Apache trên CentOS, có thể tham khảo bài viết cài đặt LAMP trên CentOS
Tạo thư mục chứa website
Ví dụ mình sẽ tạo thư mục ở folder /var/www nhé
sudo mkdir -p /var/www/example.com/public_html
Chú ý thay example.com bằng domain của bạn.
Gán quyền
Đảm bảo cho website hoạt động bình thường
sudo chown -R apache:apache /var/www/example.com/public_html
Ngoài ra chmod 755 để đảm bảo mọi người có thể xem được website của bạn
sudo chmod 755 /var/www
Cài đặt Virtual Hosts
Mình sẽ chỉnh sửa file cấu hình mặc định của Apache
sudo nano /etc/httpd/conf/httpd.conf
Thêm đoạn sau vào cuối file:
NameVirtualHost *:80
#
# NOTE: NameVirtualHost cannot be used without a port specifier
# (e.g. :80) if mod_ssl is being used, due to the nature of the
# SSL protocol.
#

#
# VirtualHost example:
# Almost any Apache directive may go into a VirtualHost container.
# The first VirtualHost section is used for requests without a known
# server name.
#
<VirtualHost *:80>
     ServerAdmin webmaster@example.com
     DocumentRoot /var/www/example.com/public_html
     ServerName www.example.com
     ServerAlias example.com
     ErrorLog /var/www/example.com/error.log
     CustomLog /var/www/example.com/requests.log common
</VirtualHost>
Bạn cần chú ý các dòng NameVirtualHost, Virtual Host, Document Root, and Server Name để sửa lại cho phù hợp.
Lưu lại và thoát.
Khởi động lại Apache
Dừng tất cả tiến trình Apache
sudo apachectl -k stop
Khởi động Apache
sudo /etc/init.d/httpd start
Test thử domain
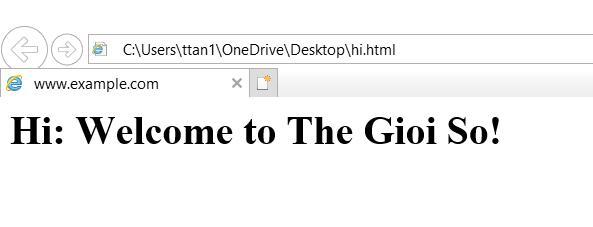
Giờ mình sẽ tạo thử file index.html để test thử domain example.com có hoạt động đúng không nhé.
sudo nano /var/www/example.com/public_html/index.html
Thêm đoạn code html vào file
<html>
  <head>
    <title>www.example.com</title>
  </head>
  <body>
    <h1>Hi: Welcome to The Gioi So!</h1>
  </body>
</html>
Lưu và thoát.
Bây giờ bạn hãy test thử với link http://example.com, nếu kết quả hiện ra như bên dưới là thành công.
Cài đặt thêm Virtual Hosts
Để add thêm nhiều website nữa, bạn có thể lặp đi lặp lại bước. Cấu trúc file config của Apache lúc nãy sẽ tương tự như sau:
<VirtualHost *:80>
     ServerAdmin webmaster@example.com
     DocumentRoot /var/www/example.com/public_html
     ServerName www.example.com
     ServerAlias example.com
     ErrorLog /etc/var/www/example.com/error.log
     CustomLog /var/www/example.com/requests.log common
</VirtualHost>
<VirtualHost *:80>
     ServerAdmin webmaster@example.org
     DocumentRoot /var/www/example.org/public_html
     ServerName www.example.org
     ServerAlias example.org
     ErrorLog /var/www/example.org/error.log
     CustomLog /var/www/example.org/requests.log common
</VirtualHost>
Khởi động lại Apache là tất cả các website sẽ hoạt động.
Như vậy chúng ta đã thêm xong website trên Apache, chúc các bạn thành công.